Scrapy Proxy Middleware
A quick guide on how to set up proxies on Scrapy Proxy Middleware.
- Open the Terminal window.
- Navigate to the main directory of your project folder using
cd yourprojectname. - Download our proxy middleware using the following command:
curl https://raw.githubusercontent.com/Smartproxy/Scrapy-Middleware/master/smartproxy_auth.py > smartproxy_auth.py
Scrapy Proxy Middleware – Download
- You should now see that your project folder contains the smartproxy_auth.py file.
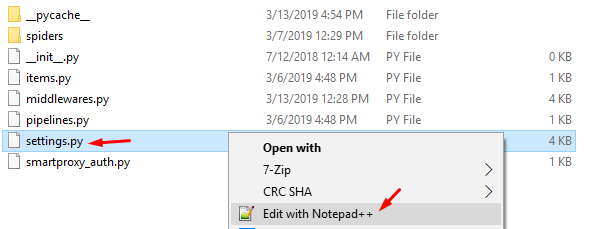
- Using a file manager, navigate to your project folder, where you should see the settings.py file.
- Edit the settings.py file using an editor of your choice.

Scrapy Proxy Middleware – Edit settings.py
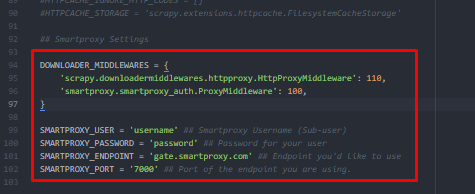
- Add the following properties at the bottom:
DOWNLOADER_MIDDLEWARES = {
    'scrapy.downloadermiddlewares.httpproxy.HttpProxyMiddleware': 110,
    'yourprojectname.smartproxy_auth.ProxyMiddleware': 100,
}

SMARTPROXY_USER = 'username' ## Smartproxy Username (Sub-user)
SMARTPROXY_PASSWORD = 'password' ## Password for your user
SMARTPROXY_ENDPOINT = 'gate.smartproxy.com' ## Endpoint you'd like to use
SMARTPROXY_PORT = '7000' ## Port of the endpoint you are using.
Scrapy Proxy Middleware – Proxy settings
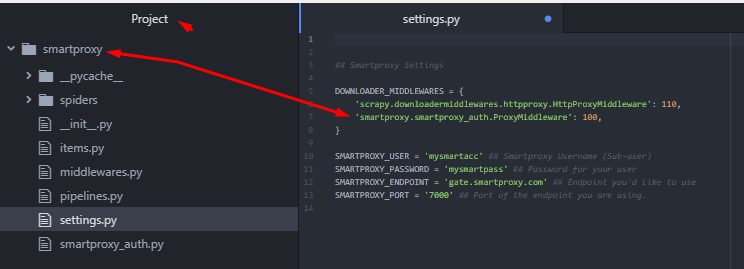
- In the DOWNLOADER_MIDDLEWARES section, change the
yourprojectnameline to the name of your project.

Scrapy Proxy Middleware – Change project name
- Make sure that you enter your account details as well as proxy details within punctuation marks ' '.
- Finally, Save the file.
To find more information about the setup, make sure to visit our Github Page. In case you wish to use Smartproxy directly in your request, please refer to this article.
Support
Need help or just want to say hello? Our customer support is available 24/7. You can also reach us anytime via email at [email protected].
Updated about 2 months ago